The Battle of Neville’s Cross in October 1346 was savage even by medieval standards. It was supposed to be a show of strength, a bold strike into northern England while Edward III was busy fighting in France. Instead, it turned into a disaster that shattered Scotland’s army, crushed its ambitions, and left its king in English hands for over a decade.
The king who had marched confidently into England days earlier was captured, his army scattered, and his ambitions in ruins. So, what went wrong and how did it all happen?
Table of Contents
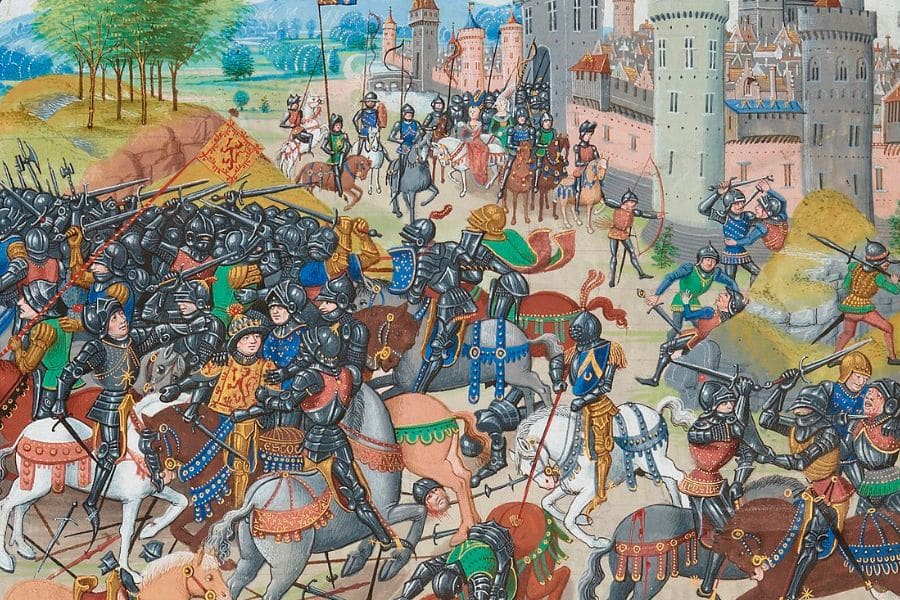
The Battle of Neville’s Cross
It started in the summer of 1346, when the Hundred Years’ War was already reshaping Europe’s political landscape. King Edward III of England had landed on the continent with one aim: to press his claim to the French throne. His campaign gathered momentum quickly.
On August 26, his army crushed the French at the Battle of Crécy, a devastating defeat for King Philip VI that left northern France exposed and his authority weakened.
Philip needed a distraction. With English forces deep in France, he turned to Scotland and invoked the Auld Alliance, the long-standing pact between the two kingdoms. If Scotland attacked England from the north, English troops and resources would be dragged away from the fighting in France. It was a strategy that had worked before, and Philip was desperate for it to work again.
King David II of Scotland agreed. He had been rebuilding his strength after returning from exile in France, and the opportunity to strike at England while its king was overseas seemed too good to ignore. In October, he gathered his forces and marched south across the border, confident that the north would be vulnerable.
But the English were not unprepared. Edward III might have been campaigning in France, but he had not left his kingdom undefended. Northern lords had been watching the border closely, and as news of the Scottish advance spread, they began to muster their troops. The clash that followed would become one of the most significant battles fought on English soil during the entire war.

David II’s Plan to Invade England
David II had several motives for marching into England in the autumn of 1346. The Auld Alliance made it clear that Scotland was expected to open a second front when France was under pressure, but this was also a chance for David to assert himself as a capable king.
He had spent much of his youth in exile at the French court after his father’s death at Bannockburn and was eager to prove both his loyalty to Philip VI and his strength as a ruler in his own right.
The plan was simple enough. With Edward III and many of his best troops campaigning in France, the northern counties of England appeared exposed. David’s army would cross the border, capture key strongholds, and raid deep into northern territory, forcing the English to recall men from France and perhaps even negotiate from a weaker position. His advisers believed they would face little resistance beyond local militias and hastily raised levies.
Estimates of the Scottish force vary widely in contemporary sources, but most accounts place the number at between 12,000 and 17,000 men. It was one of the largest armies Scotland had assembled in a generation, drawn from powerful noble houses and backed by experienced commanders like William Douglas and the Earl of Moray.
With such strength behind him and confident that northern England lay open before them, David expected a swift and successful campaign. He was about to learn how wrong that assumption was.

The Northern Lords Rally and Prepare for Battle
News of the Scottish invasion spread quickly through northern England. With Edward III and much of the royal army in France, it fell to local magnates to defend the realm. Queen Philippa of Hainault, acting as regent in her husband’s absence, played a crucial role in the response.
She issued the call to arms, urged the northern lords to assemble their forces, and even rode north herself to oversee the defense. Chroniclers noted how her presence boosted morale and showed the crown’s determination to resist the Scottish invasion.
Ralph Neville, Henry Percy, and Archbishop William Zouche answered the call, raising an army of knights, men-at-arms, and archers drawn from local levies and retainers. These were men with deep ties to the north, well-versed in its terrain and practiced in raising troops at short notice. Within days, they had assembled an army of knights, men-at-arms, and archers drawn from local levies and retainers.
Rather than rushing into a direct confrontation, the English commanders chose their ground carefully. They positioned their forces on a ridge west of Durham, near a crossroads known as Neville’s Cross. The high ground offered a clear advantage, giving their archers and infantry a strong defensive position and forcing the Scots to fight uphill if they advanced. It was a calculated decision that turned the landscape itself into a weapon.
From this position, the English waited. They knew the Scots were nearby, advancing deeper into English territory, confident of an easy victory. But when David II’s army finally approached, they would find not scattered militias but a well-prepared force blocking their path, and ready to fight.

Hooked on the Middle Ages? Get more stories like this one in your inbox.
The Ground That Would Seal Scotland’s Fate
The English choice of battlefield was no accident. The ridge at Red Hills, just west of Durham near Crossgate Moor, offered a natural defensive stronghold. Its elevated position gave the English a commanding view of the surrounding land, and any advancing force would have to fight its way up the hill, a serious disadvantage in a medieval battle.
To the south and west, the steep banks of the River Browney created a natural barrier that limited the Scots’ ability to maneuver. Dense woodland and uneven ground on the flanks narrowed the available approach even further, funnelling the invading army into a confined space directly in front of the English line. Once there, they would be easy targets for English longbowmen and vulnerable to counterattacks.
For David II, this terrain was a trap disguised as open ground. His army, larger but less flexible, would find itself compressed and unable to deploy to its full strength. The high ridge and tight approach corridors would shape the battle before the first arrows were even loosed, and those who had chosen the ground knew it.

Two Armies Face Each Other on the Eve of Battle
By the evening of October 16, 1346, both armies were within striking distance of each other. David II arranged his forces into three divisions. The right was commanded by the Earl of Moray and Sir William Douglas, both veteran commanders with experience fighting the English.
David himself led the center, while the left was under the command of Robert Stewart, the king’s nephew and heir. It was a traditional deployment meant to deliver a strong frontal assault, relying on the weight of numbers and close combat to break the enemy line.
The English mirrored this formation with three “battles” of their own. The vanguard under Henry Percy and Thomas Rokeby held one flank, while Ralph Neville commanded the center. The rearguard, led by Archbishop William Zouche and Lord Mowbray, stood ready to reinforce the line or exploit any weakness. In front of them, screens of longbowmen took up positions on the slopes, ready to unleash volleys on the approaching Scots before the melee began.
The Scots held a clear advantage in numbers, but many of the English troops were seasoned fighters with years of experience from campaigns in France, while a significant portion of the Scottish host consisted of recently levied men with less training.
The English also held the better ground. Their line stretched across the top of the ridge, flanks anchored by steep scarps and the bends of the River Browney. Access routes into the area were limited, with the Sunderland Bridge and the Great North Road providing the only reliable ways forward.
A Battle Fought from Noon Until Dusk
The morning of October 17 began with tense silence as both armies formed their lines. Around midday, the fighting began in earnest. English longbowmen loosed their arrows as the Scots advanced uphill, and the first clashes between billmen and spearmen quickly followed. The front lines surged back and forth in brutal hand-to-hand combat, but neither side could gain a decisive advantage in the opening phase.
According to a letter written by Thomas Sampson, the fighting raged continuously from noon until vespers, with neither army willing to yield.
The first serious cracks appeared on the Scottish right. As Moray and Douglas tried to advance, their divisions became bogged down in rough ground around enclosures and ditches near Arbour House. The difficult terrain broke their momentum and threw their formations into disarray. English archers exploited the confusion, cutting down exposed Scots and forcing them back before they could regroup.
With the enemy’s flank faltering, English commanders seized the moment. Mowbray and Rokeby maneuvered their forces to press hard against the center, where David II commanded. Under relentless pressure and hemmed in by the landscape, the royal division began to lose cohesion.
Any chance of recovery vanished when Robert Stewart, commanding the Scottish left, withdrew his men without fully engaging. His departure left the king’s division isolated and vulnerable. As English forces tightened the noose, resistance collapsed.
By late afternoon, the Scottish line was broken, and what had begun as a confident invasion turned into a desperate retreat. Survivors scattered toward Findon Hill, pursued by English cavalry and infantry determined to finish the rout.
King David II’s Last Stand and Capture
Even as his army collapsed around him, David II refused to flee. He stayed on the field and fought on with a small group of retainers while English troops closed in. During the final stages of the battle, he was struck in the face by two arrows, one of which is believed to have lodged near his jaw and caused him severe headaches for the rest of his life. Despite his injuries, he continued to resist, cutting down attackers and refusing to surrender.
As the fighting spilled away from the main battlefield, David was eventually forced to seek cover. Legend says he tried to hide beneath a bridge over the River Browney, a spot believed to be Aldin Grange Bridge near the site of the battle. It was there, according to later accounts, that English soldiers discovered him and dragged him from his hiding place.
The man credited with capturing the Scottish king was John de Coupland, a Northumbrian knight who distinguished himself that day. In the struggle to take David alive, he reportedly struck the wounded king in the face, knocking out several of his teeth before subduing him.
Coupland delivered his prisoner to King Edward III and was richly rewarded with land, money, and royal favor. For David, the long road to captivity had begun. He would spend the next eleven years as a prisoner in England.

The Long Aftermath of Neville’s Cross
David II’s capture changed the balance of power between England and Scotland for years to come. In the immediate aftermath of the battle, he was taken first to Bamburgh Castle before being transferred to the Tower of London. From there, he was moved between several royal residences, including Windsor Castle and Odiham, where he would spend most of his captivity.
The English crown took no chances with its valuable prisoner. He was kept under close guard, his contact with Scotland carefully limited, and after 1355 he was almost entirely cut off from his political allies north of the border. In total, David spent eleven years as a captive, a humbling experience for a king who had once marched confidently into England expecting victory.
Back in Scotland, his absence created a power vacuum that reshaped the kingdom’s political landscape. Robert Stewart, who had commanded the left division at Neville’s Cross and later became King Robert II, assumed the role of Guardian of the Realm.
Under his leadership, Scotland faced internal tensions, shifting alliances, and the ongoing challenge of defending its borders without its monarch. The defeat had weakened Scotland militarily and politically, and it took years for the realm to recover its footing.
Peace finally came more than a decade later. On October 3, 1357, the Treaty of Berwick was signed, securing David’s release in exchange for a ransom of 100,000 marks to be paid over ten years. The agreement also established a truce that brought a period of relative stability to the Anglo-Scottish border.
The ransom payments placed a heavy burden on Scotland’s finances, but David’s return marked the end of one of the most disastrous episodes in the kingdom’s medieval history. The scars left by Neville’s Cross, however, would endure for generations.
Love a good medieval story?
Join our readers and get tales of kings, queens, castles and ordinary medieval lives straight to your inbox.

Kylie Lang is a nationally syndicated travel journalist with bylines on the Associated Press Wire & more, a medieval history writer, and the founder and lead author of Tales of the Middle Ages (talesofthemiddleages.com). She holds a BA (Honours) in History from the University of Kent and is a member of the British Guild of Travel Writers.
Related posts:
 September 4, 925: The Day England’s First King, Æthelstan, Was Crowned, But Was He?
 Sweyn Forkbeard: The First Viking King of England
 The Battle of Poitiers: The Black Prince’s Boldest Victory and the Capture Of a French King
 The Battle of Crécy 1346: How a Teenage Prince and a Wall of Arrows Brought France to Its Knees